How to Start Seeds Indoors (10 Steps for Strong, Healthy Seedlings)
This post may contain affiliate links, which means that I may receive a commission if you make a purchase using these links. As an Amazon Associate I earn from qualifying purchases.
Learn how to start seeds indoors with this simple step-by-step guide. Grow strong, healthy seedlings at home with the right light, soil, timing, and care.

Starting seeds indoors is one of my favorite winter rituals. While the garden sleeps under a blanket of snow, there’s something magical about watching tiny seeds wake up under the glow of grow lights. It’s a gentle reminder that spring is on the way and that you don’t have to wait for warm weather to begin the gardening season.
Growing your own seedlings gives you more control over your garden. You can choose the exact varieties you love, grow the number of plants you actually need, and time your sowing schedule to match your climate. Even better? It’s far more affordable than buying nursery plants, and the selection of seeds is nearly endless.
Whether this is your very first year starting seeds or your tenth, having a clear and dependable process makes everything easier. In this guide, I’ll walk you through the step-by-step process of starting seeds indoors, using the same approach I’ve followed for many seasons.
We’ll cover how to set up your seed-starting area, how to sow and care for seedlings, how to prepare young plants for outdoor transition, and the most common mistakes to avoid.
Before we dive into the ten steps, let’s look at why starting your own seedlings is such a smart addition to your garden planning.
Why Start Seeds Indoors?
If you’ve ever felt that February is just a little too long, seed starting is the cure. The moment those first sprouts appear under your grow lights, winter suddenly feels shorter, and spring feels within reach.
Starting your own seedlings offers more than just a jump on the gardening season. It gives you flexibility, savings, and the chance to grow stronger, healthier plants.
Here are the top benefits of starting seeds indoors:
- You Get the Varieties You Truly Want: Garden centers and plant nurseries carry only a small selection of vegetables. Starting your own seeds opens the door to unique colors, heirloom varieties, flavors, and specialty crops you cannot find in stores.
- You Save Money: A single packet of seeds costs less than one nursery transplant. Growing your own seedlings significantly reduces the cost of filling a garden.
- You Control the Timing: You can sow seeds exactly when your climate requires. This makes it easier to coordinate your garden layout, succession plantings, and seed starting schedule.
- Your Plants Are Healthier: Seedlings grown indoors under proper care are often sturdier and far better prepared for transplanting than stressed, overgrown nursery plants.
- Get a Jump on the Season: For gardeners in short-season climates like mine in Maine, starting seeds indoors gives warm-weather crops enough time to mature before the first frost.
- And Yes, It Brings a Little Hope to Winter: Tending tiny green seedlings while snow piles up outside adds a welcome bit of light and life to the darker months.
After starting my own indoor seedlings for over a decade, I can tell you these benefits have held true year after year. It’s one of the most rewarding parts of the gardening year.
Now that you know the benefits, let’s get set up. A little organization at the beginning will make the whole seed-starting process smoother and stress-free.
Before You Begin: Get Organized
Starting seeds indoors is much easier when you take a little time to get organized first. By this point in your garden-planning process, you should have a good sense of what you want to grow, how many plants you need, and when each crop should be started.
If you’re still working through these steps, here’s a quick refresher with helpful links:
- How to Choose Vegetables for Your Garden: Choose what to grow based on your goals, climate, and favorite foods.
- Tips for Buying Seeds for Your Vegetable Garden: Take inventory and purchase seeds so you have everything ready before sowing begins.
- How to Plan and Map Your Beds: Map your garden beds to determine how many seedlings you’ll need for each space.
- How to Create a Seed Starting Schedule: Develop a seed starting and planting schedule based on your last frost date to ensure every crop is sown at the optimal time.
Completing these steps first will give you a clear list of how many seedlings to start, when to start them, and where they will eventually be planted. This foundation makes the seed-starting process smooth and stress-free, especially once your grow lights and trays fill up!
What You’ll Need to Start Seeds Indoors
Before you jump into the step-by-step process, it helps to gather a few basic supplies. You don’t need anything fancy to grow strong, healthy seedlings, just the right containers, fresh seed-starting mix, consistent light, and a simple setup that keeps everything organized. Having these materials ready before you sow makes the whole process smoother and far more enjoyable.
Containers or Soil Blocks
Traditional nursery cell packs and seedling trays are great, but soil blocks are another excellent option if you want to skip plastic and grow sturdier, air-pruned seedlings. Learn more: How to Use Soil Blocks for Growing Seedlings.
Prefer to keep things simple (and frugal)? Many common household items work beautifully for seed starting. I share some of my favorites in Recycled Seed Starting Containers for Gardening.
Use what you have and what fits your gardening style. Your seeds don’t mind whether they sprout in a tray, a soil block, or a yogurt cup.
Seed Starting Mix
A high-quality seed starting mix provides your seedlings with the best possible start. Unlike garden soil or reused potting mix, seed starting blends are sterile, meaning they’re free of weed seeds, soil-borne diseases, and pests that can easily wipe out tender young seedlings.
These mixes are also formulated to be light, fluffy, and fast-draining, allowing tiny roots to grow without resistance. This prevents the compaction issues that often happen when using garden soil indoors.
Grow Lights and a Timer
Even a bright window isn’t enough for most seedlings in late winter. Consistent, intense light keeps plants compact and prevents legginess. Learn more here: Using Grow Lights for Seedlings and Indoor Gardens.
Simple florescent shop lights or LED grow lights work wonderfully. Just keep them a few inches above the seedlings and run them 14–16 hours a day. A timer makes it effortless. I set my timer on my lights for 16 hours on, then 8 hours off.
Heat Mat (Optional but Helpful)
Many vegetable seeds germinate best in warm soil, typically between 70°F and 75°F (21 °C–24°C). If your seed-starting area is cool (such as a basement or an unheated room), germination can be slow or uneven.
A seedling heat mat gently warms the soil from beneath, helping:
- Speed up germination
- Improve sprouting consistency
- Reduce mold issues by helping the surface dry more evenly
Heat mats are especially beneficial for warmth-loving crops, such as peppers, tomatoes, eggplants, and many herbs. Once seeds sprout, you can turn the mat off and let the grow lights take over.
Plant Labels and Tray System
Good organization makes seed starting so much easier. Every container should have a label with the crop name and variety. Trust me, you will not remember later!
You’ll also need trays to:
- Catch water beneath containers
- Group plants by crop
- Move seedlings easily between shelves, windowsills, or grow lights
Simple plastic boot trays, cafeteria trays, or standard nursery trays all work well. Reuse them year after year to reduce waste.
Spray Bottle or Gentle Watering Tool (Optional but Handy)
A fine-mist spray bottle helps you water newly planted seeds without disturbing them. As seedlings grow, switch to bottom watering so roots can drink from below without soaking the leaves.
Once you have your tools and setup in place, the fun part begins. Now you can move on to the step-by-step process of sowing seeds and growing strong, healthy seedlings indoors.
10 Steps to Starting Seeds Indoors
Starting seedlings indoors doesn’t have to be complicated. Once you have your materials ready, the process follows a simple rhythm: prepare your space, sow your seeds, provide them with the right light and moisture, and help them grow strong until planting day.
These steps walk you through exactly how to start healthy seedlings from the moment you open a seed packet to the day your plants head out for hardening off.
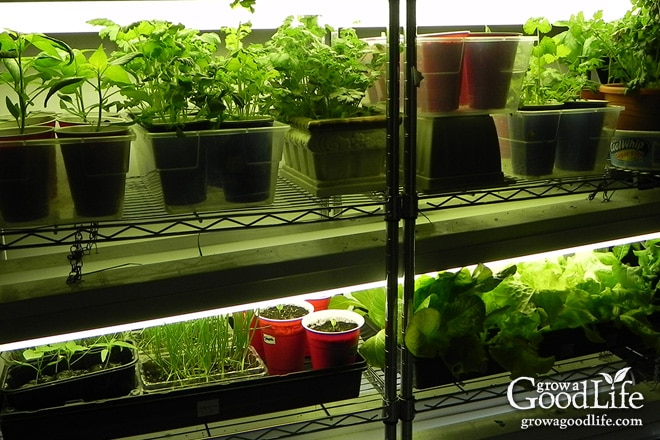
Step 1: Set Up Your Seed Starting Area
Healthy seedlings begin with a good environment. Most homes don’t have enough natural light in late winter for strong growth, so setting up a dedicated seed-starting area is one of the most important steps you can take.
You don’t need a fancy system, just a simple shelving unit, a table, or any flat surface that can safely support trays and lighting. For a look at the simple system I use, visit: How to Assemble a Grow Light Shelving System.
Here’s what your seed-starting area should provide:
- Bright, consistent light: Seedlings need 12–16 hours of light per day to stay compact and sturdy. Most gardeners use shop lights hung 2–3 inches above the seedlings. Adjust the height as plants grow.
- Stable temperatures: Cool rooms slow down germination and can stunt the growth of warm-season crops. Aim for 65–75°F (18–24°C). If your space runs cooler, a heat mat can speed germination.
- Protection from drafts: Avoid placing seedlings near exterior doors or cold windows where nighttime temperatures fluctuate.
- Waterproof trays: Seedlings require frequent watering, so place trays on a shelf or table that can handle moisture.
- A timer: Plug your lights into a timer set for 16 hours on / 8 hours off so your seedlings get consistent day/night cycles without extra work on your part.
A well-set seed-starting area becomes the heart of your early gardening season: Organized, dependable, and ready to support hundreds of healthy seedlings each year.
Step 2: Choose and Prepare Your Seedling Containers
You can start seeds in almost any small container, as long as it drains well and holds enough soil for the seedlings to grow strong before transplanting. The key is choosing a system that fits your gardening style, budget, and space.
Great container options include:
- Nursery cell packs or seed trays: These are lightweight, uniform, and easy to label. Cell packs are ideal for starting many seedlings at once.
- Soil blocks: A soil block maker compresses moistened seed mix into freestanding cubes, eliminating the need for plastic pots altogether. Soil blocks encourage strong root systems and reduce transplant shock.
- Recycled containers: Yogurt cups, produce clamshells, tin cans, and other household items can serve as excellent seed-starting vessels if cleaned well and fitted with drainage holes.
No matter which containers you choose, cleaning is essential. Wash trays and pots in warm, soapy water, then rinse thoroughly to remove any lingering debris or disease spores. This simple step helps prevent damping-off and other seedling diseases.
Once everything is clean and ready, place your containers in waterproof trays or tubs so you can water efficiently and avoid messes in your seed-starting area.
Step 3: Prepare Your Seed Starting Mix
Healthy seedlings begin with the right soil. Garden soil or reused potting mix may seem convenient, but they often contain pathogens, fungus, or insect eggs that can wipe out young seedlings before they have a chance to grow. That’s why using fresh, sterile seed starting mix is so important.
Seed starting mix is formulated to be:
- Lightweight and fine-textured, so tiny roots can grow easily.
- Sterile, reducing the risk of damping-off and disease.
- Moisture-retentive but well-draining, preventing soggy conditions that weaken seedlings.
- Nutrient-light, which encourages strong early root development.
Before filling your containers, pre-moisten the mix. Dry mix can repel water at first, so blending in warm water until it reaches a “wrung-out sponge” consistency makes it much easier to work with.
Here’s how to prepare it:
- Add seed starting mix to a clean bucket or bowl.
- Pour in warm water a little at a time.
- Mix and let it sit until the soil mix is damp but not dripping.
- Fill your containers, and gently press to remove air pockets.
- Leave about 1/2 inch of space at the top so watering is easier.
At this stage, your containers are fully prepped and ready for seeds.

Step 4: Sow the Seeds at the Correct Depth
Every seed has a preferred planting depth, and following that guidance makes a big difference in germination. Too deep, and seedlings may never reach the surface. Too shallow, and they can dry out quickly or fail to root.
The seed packet is your best guide. Most will include instructions such as “sow 1/4 inch deep” or “press into the surface.” As a general rule:
- Tiny seeds (lettuce, basil, many herbs): Sow them on the surface and gently press them into the soil so they make contact.
- Small to medium seeds (tomatoes, peppers, brassicas): Cover lightly with a thin layer of the soil mix.
- Larger seeds (squash, cucumbers, melons): Plant them deeper, usually about 1 inch.
To sow:
- Use a pencil, skewer, or your finger to make a small hole or indentation.
- Drop in 1–3 seeds depending on the crop and your thinning preference.
- Gently cover with moist seed starting mix (unless surface-sowing).
- Press lightly so the seed contacts the soil.
- Mist the top to settle everything in place.
Be sure to label each container with the crop variety and note the sowing date in your seed starting schedule. It’s surprisingly easy to forget what’s what once trays fill up.
For an extra-sure start, you can also pre-sprout seeds before planting. This ensures you’re only planting viable seeds, eliminating the need for later thinning.
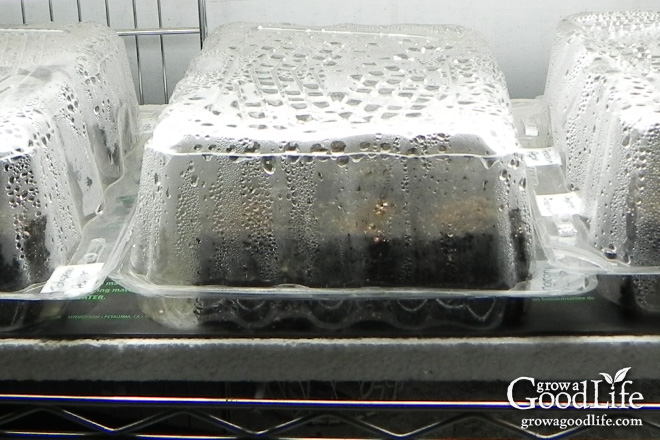
Step 5: Provide Warmth for Germination
Once you sow your seeds into damp seed starting mix, warmth becomes the key to waking them up. Most vegetable seeds germinate best between 65–75°F (18–24°C). Too cool, and they sprout slowly (or not at all). A warm, steady temperature encourages fast, even germination.
You have a few options:
- Use a seedling heat mat for the most reliable results. Heat mats gently warm the soil from below, which speeds germination for peppers, tomatoes, eggplant, and many herbs.
- Place trays in a naturally warm spot, such as the top of a refrigerator or near a heating vent (but not in direct heat or on top of appliances that run hot).
- Avoid sunny windowsills for germination. They cause fluctuating temperatures and often dry out the soil.
After sowing:
- Cover trays with a humidity dome or plastic cover to help retain warmth and moisture.
- Check once or twice daily. If the mix looks dry on top, mist lightly.
- As soon as you see seedlings emerging, remove the dome and move the trays under lights.
A consistent warm environment helps ensure your seedlings get off to the strongest possible start.
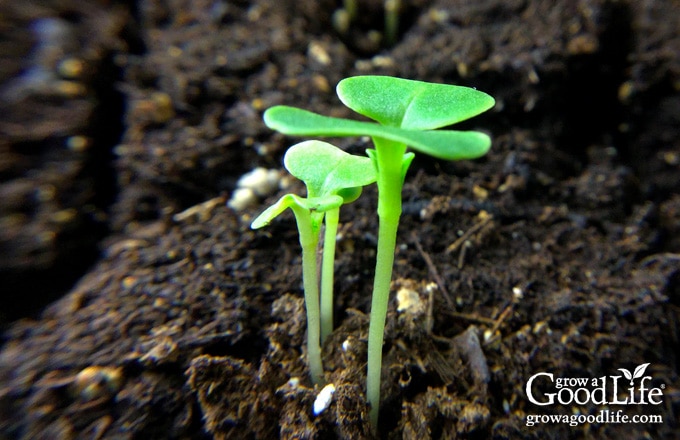
Step 6: Move Sprouted Seedlings Under Lights
As soon as you see green sprouts poking through the soil, it’s time to remove the humidity dome and get the seedlings under lights. Good light in these early days is essential for preventing leggy, weak plants.
Set your seedlings up for success by:
- Keeping lights close: Position grow lights 2–3 inches above the tops of the seedlings. Raise the lights as the plants grow so they stay just above the foliage.
- Using a timer: Aim for 14–16 hours of light per day. A simple outlet timer keeps your schedule consistent and prevents accidental overexposure.
- Ensuring even coverage: Both fluorescent lights and LED full-spectrum grow lights work well. Just make sure the entire tray receives uniform light so the seedlings grow straight and strong.
When seedlings transition from warm, dark germination conditions to bright grow lights, you’ll often see a noticeable boost in vigor within just a day or two.
Seedlings grown under consistent, bright light develop sturdy stems, compact growth, and a healthy green color.

Step 7: Water Seedlings Properly
Healthy seedlings depend on even moisture, but not too much of it. Young roots are delicate, and overly wet soil can quickly lead to damping off, mold, or stunted growth. The goal is to keep the soil consistently moist, never soggy.
Here’s how to water seedlings the right way:
- Start gently: In the earliest days, use a mister or small turkey baster or squeeze bottle to moisten the soil surface without disturbing tiny sprouts.
- Switch to bottom-watering: Once seedlings develop small root systems, water by adding water to the tray beneath your containers. This allows the soil to wick up moisture as needed, keeping foliage dry and reducing the risk of disease.
- Dump extra water: If water remains in the tray after 20–30 minutes, pour it out so the roots aren’t sitting in wet soil.
- Watch the soil, not the calendar: Before watering again, let the top of the soil become lightly dry to the touch. This encourages strong root development.
- Increase airflow: A small fan on low helps the soil surface dry evenly and strengthens stems. You are aiming for a light breeze. Place it a few feet away from the seedlings.
Proper watering is one of the most important skills in seed starting. Once you find the rhythm, your seedlings will stay sturdy, healthy, and ready for the next stage.
Step 8: Feed Seedlings After True Leaves Form
Most seed starting mixes contain no added nutrients, which is ideal for germination but not enough to sustain growing plants for long. Seeds rely on their built-in food reserves at first, but once the first sets of true leaves appear (the second set of leaves your seedlings grow), it’s time to begin feeding them.
How to fertilize seedlings correctly:
- Start with a gentle, diluted fertilizer: Use an organic liquid fertilizer, such as fish emulsion, seaweed fertilizer, or worm-casting tea, mixed at half strength. Seedlings are tender, and too strong a fertilizer can burn their roots.
- Feed lightly but consistently: Apply fertilizer every 7–10 days during watering, or follow the label instructions for your chosen product.
- Water first, then feed: Giving seedlings a small drink before fertilizing helps prevent shock and allows the roots to absorb nutrients more evenly.
Watch how plants respond:
- Pale or slow-growing seedlings may need slightly more frequent feeding.
- Seedlings getting overly tall or lush may need less fertilizer and more light.
Feeding at the right time provides your seedlings with the boost they need to develop strong stems, sturdy leaves, and the root systems that will support them once they are moved outdoors.
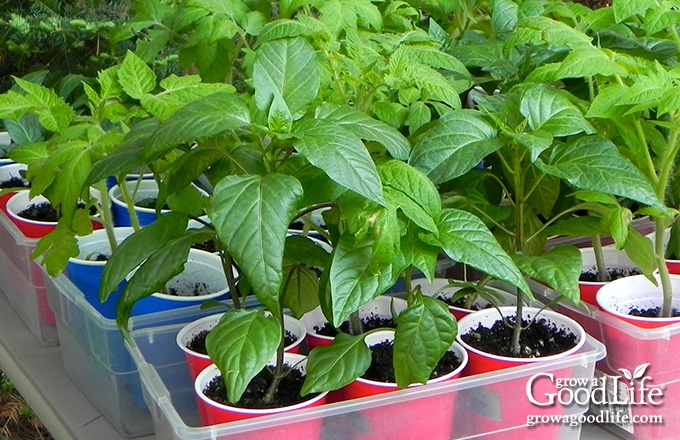
Step 9: Thin or Pot Up Seedlings as Needed
As your seedlings grow, they’ll begin to compete for space, nutrients, and light. Giving each plant enough room is key to raising strong, healthy transplants.
Thin Extra Seedlings (When Multiple Seeds Sprout)
If you sowed more than one seed per cell or container, you’ll often end up with two or three sprouts. Choose the strongest, healthiest seedling and remove the others.
- The easiest and least stressful method is to snip the extras at the soil line using small scissors.
- Avoid pulling them out. This can disturb the roots of the seedling you want to keep.
If you prefer, you can gently rescue and repot extras, but be aware that root disturbance may stunt growth.
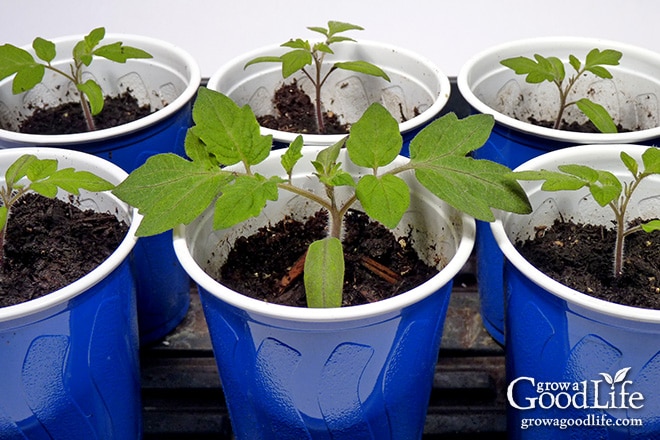
Pot Up Seedlings That Outgrow Their Containers
Some crops, especially tomatoes, peppers, brassicas, and herbs, may need more space before it’s warm enough to transplant outdoors.
You’ll know it’s time to move them to a larger pot when:
- The roots fill the container
- Plants dry out quickly between waterings
- Growth slows even though light and water are adequate
To pot up:
- Water seedlings well before handling them.
- Prepare a slightly larger container with pre-moistened potting mix.
- Gently slip the root ball out of its original container (never tug the stem).
- Replant at the same depth (except tomatoes, which can be buried deeper to encourage more root growth).
- Water the plant gently and return it to bright light.
Potting up gives seedlings the root room they need to grow steadily until they are ready to be transplanted into the garden.
Step 10: Hardening Off and Transplanting Seedlings to the Garden
Before seedlings move into the garden, they need time to adjust to outdoor conditions. Hardening off helps plants transition from the controlled indoor environment to real sunlight, wind, cooler nights, and fluctuating temperatures so they don’t become stressed or sunburned.
Hardening Off Seedlings Before Transplanting
Start placing seedlings outside for short periods each day, gradually increasing the time over the course of a week. This gentle transition results in sturdier, more resilient plants. Learn the step-by-step method: How to Harden Off Seedlings.
By the end of the hardening-off period, your seedlings will look noticeably tougher. Stems become thicker, leaves firm up, and overall growth becomes sturdier. Once this transition is complete, your plants are ready for the garden and will establish far more smoothly than seedlings moved outdoors all at once.
Transplanting Seedlings Into the Garden
Once seedlings are fully hardened off, it’s time to transplant:
- Prepare garden beds ahead of time. If the soil is dry, water the bed thoroughly the day before planting so seedlings aren’t placed into dry ground.
- Choose calm, mild conditions. A cloudy day with little wind is ideal. Planting in late afternoon or early evening helps plants settle in before facing full sun.
- Water well after planting. Moist soil protects roots, reduces stress, and encourages quick establishment.
Give Young Transplants a Strong Start
During their first week outdoors, seedlings still benefit from a bit of extra care:
- Provide light shade if the sun is intense, especially for tender crops like lettuce and brassicas.
- Protect from strong winds with row cover, shade cloth, or even overturned crates.
- Keep the soil consistently moist until you see new growth.
Once plants perk up and begin forming fresh leaves, they are officially established.
Mulch for Moisture and Weed Control
After seedlings take hold, apply a light layer of mulch such as straw, shredded leaves, or wood chips. Keep mulch a few inches away from stems to prevent moisture buildup. Mulching helps retain soil moisture, regulate soil temperature, and reduce weed growth. Learn more: 5 Ways Organic Mulch Helps Your Vegetable Garden.
Proper hardening off and transplanting practices set your plants up for success, ensuring they take off quickly once they’re in the garden.

Having Seed Starting Issues?
If your seedlings look leggy, wilted, spotty, or slow to grow, you’re not alone. These are some of the most common challenges gardeners face. Instead of trying to troubleshoot everything here, I’ve put together a separate guide that walks you through the most frequent problems and how to fix them.
Learn what causes slow germination, damping off, yellow leaves, leggy seedlings, and how to get your plants back on track.
Your Seed Starting Journey Begins Here
Starting seeds indoors is one of the most rewarding parts of the gardening year. With a little planning, the right setup, and a weekly routine, those tiny seeds you sow today will become sturdy seedlings ready to flourish in your garden this spring.
By organizing your supplies, creating a seed starting schedule, and following each step in this guide, you’ll grow stronger plants, reduce transplant shock, and set yourself up for a healthier, more productive gardening season.
The best part? Once you build your seed starting system, it gets easier every year. Your notes become more reliable, your timing becomes second nature, and your confidence grows right alongside your seedlings.
So take your time, enjoy the process, and embrace these small winter tasks. They’re the very first step toward the harvests you’ll enjoy all season long.
More Resources in the Planning Your Vegetable Garden Series:
- How to Choose which Vegetables to Grow
- Tips for Buying Seeds
- How to Map Your Garden Beds
- How to Make a Seed Starting Schedule
This article was originally published on February 2, 2010. It has been updated with expanded guidance, improved step-by-step instructions, and additional resources based on over 15 years of hands-on seed-starting experience.

Are lettuces best to start indoors or outside? TY
Bb, Both indoor and outdoor methods can work well for growing lettuce! Starting lettuce indoors allows you to transplant seedlings into the garden, giving you an earlier harvest. However, lettuce seeds can also be directly sown outdoors, and they will germinate and grow well in the garden. It ultimately depends on your preference and the timing of your planting. Check out our Lettuce Growing Guide for tips.
When is it time to remove them from the warm mat? Thanks for the wonderful post!!
Kristin, Once your seeds have germinated, you can remove the humidity dome, transfer the seed tray off the heat mat, and place it under lights. Best of luck with your seedlings, and feel free to reach out if you have any more questions!
How long should grow lights be used when growing seedlings indoors
Seedlings need at least 12-16 hours of light each day. I set my timer on my lights for 16 hours on, then 8 hours off. Keep the lights about 2-inches above the seedlings. Adjust as the plants grow.
Hey, My husband and I keep fighting over how much water to give our seedlings now that they have sprouted. I think every three days, and he wants to water them every day because the cow pots are wicking a lot of moisture, he thinks, from the plants. However, mold is starting to form around the edges of the cow pots and in the soil. Have we damaged our seedlings beyond repair?
Alison, No, you have not damaged the seedlings. A little mold won’t hurt them. Just use a fork to remove the mold. Leave space between the pots and use a small fan to improve air circulation.
The cowpots do wick moisture, so you may need to water more frequently. Keep the soil surface damp until the seeds sprout, and then water when the pots are dry. Cowpots turn light brown when they are dry, and dark brown when watered. Bottom water by setting the pots in a tray of warm water and let them wick moisture until the pot and top of the soil is damp. Let them dry out a bit in between watering.
I am a first time herb grower. I purchased an indoor system with a light at the top. I bought seeds. I put the whole package into one container. Should I have only put a few seeds in each one? Thank you!
Ann, If all the seeds sprout, you may need to thin out to give the plants room to grow. You can do this over time as you need the herbs for meals.
I am growing seedlings indoors and they are ready to transfer to a bigger pot and all I have is 5 gallon ones. Is that too big of a jump up in size or will they still continue to grow? Novice gardener. Making this a science project for my kids and saw this post after I moved them to 5 gallon pots. Thanks!
Katie, 5-gallon containers are great! It will give your seedlings a healthy environment to stretch their roots and grow into vigorous plants.
How long do you let seedlings sit in water when watering from the bottom?
Leigh Ann, A few hours should be sufficient for the seedlings to soak up water.